Networking with NSOperation as Your Wingman
Sometimes the tools that make our lives easier also make our architecture worse. When something is hard to do, we build structure around it, and that structure often leads us to make smarter decisions and be more thoughtful with what does what. When a new tool removes that difficulty, we remove the structure with it - and in doing so, lose the benefits we never even realised the structure gave us.
When NSURLConnection was the only networking option on iOS, its delegate-based approach required so much boilerplate that developers naturally pushed networking code out of their view controllers and into dedicated classes. The boilerplate was tedious, but it had an architectural side effect worth preserving - a distinct networking layer with clear responsibilities. When NSURLSession was released with its far more developer-friendly, closure-based interface, we jumped at the chance to remove all that boilerplate. But the ease of making network calls meant that we no longer had to keep networking at arm's length. Network requests, JSON parsing, and response handling started appearing directly in view controllers alongside their existing responsibilities 💥 - a quiet erosion of the single responsibility principle that made our codebases harder to understand and more brittle to change.

In this post, I want to explore how we can use NSOperation and NSOperationQueue to get back to an isolated networking layer.
This post is based on an
Objective-Cexample. If you are more interested in seeing how to combine networking and operations based on aSwiftexample, head over to the more recent "Building a networking layer with operations" post.
Getting the Lay of the Land
Before jumping into the details, let's take a moment to look at the overall architecture we're going to put in place and how each component fits into it.
Our networking layer will have three main responsibilities:
- Scheduling network requests.
- Performing networking requests.
- Parsing the response from network requests.
These responsibilities will come together to produce the following class structure:
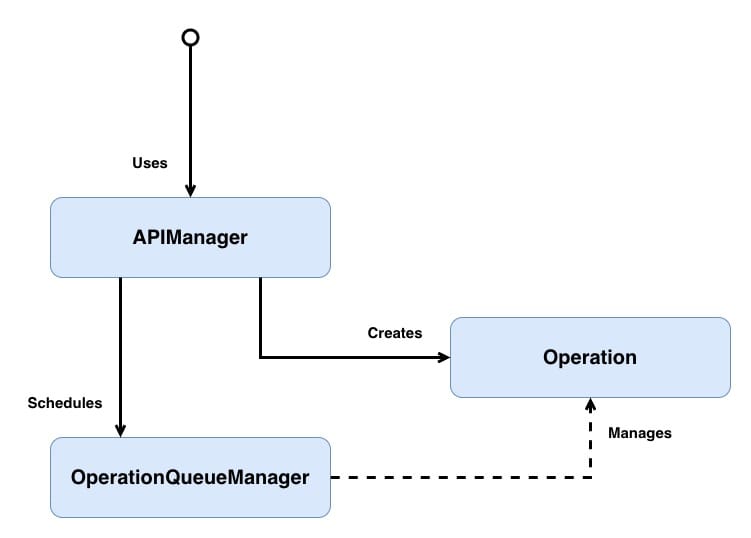
- The entry point represents whichever feature triggers the data fetch; it could be a view controller, service, etc.
APIManagercreates an operation and schedules it on theOperationQueueManager. Ideally, the feature should never care where the data that powers it comes from; theAPIManagerensures that it doesn't.OperationQueueManageris a singleton that controls when operations are executed.Operationis a concurrentNSOperationsubclass that encapsulates the network request and parsing for a given endpoint.
I've used generic naming in the class diagram, but in the example, we will be working in concrete types, so
APIManagerwill becomeNWMAnswersAPIManagerandOperationwill becomeNWMAnswersRetrievalOperation, but anyAPIManagerorOperationcould be substituted in.
Don't worry if that doesn't all make sense yet; we will look into each class in greater depth below.
Let's take a small recap of what NSOperationQueue and NSOperation are.
NSOperationQueue is responsible for coordinating the execution of operations. Rather than executing work immediately, it schedules operations based on each operation's readiness, priority, dependencies, and available system resources.
Because NSOperationQueue maintains visibility over its operations, we can inspect, pause, or cancel them — for example, cancelling in-flight requests when a user logs out.
Under the hood, NSOperationQueue leverages GCD, allowing it to take advantage of multiple cores without the developer needing to manage threads directly. By default, it will execute as many operations in parallel as the device can reasonably support.
NSOperation is an abstract class which needs to be subclassed to undertake a specific task. An NSOperation typically runs on a separate thread from the one that created it. Each operation is controlled via an internal state machine; the possible states are:
Pendingindicates that the operation has been added to the queue.Readyindicates that the operation is good to go, and if there is space on the queue, this operation's task can be started.Executingindicates that the operation is actually doing work at the moment.Finishedindicates that the operation has completed its task and should be removed from the queue.Cancelledindicates that the operation has been cancelled and should stop its execution.
A typical operation's lifecycle will move through the following states:
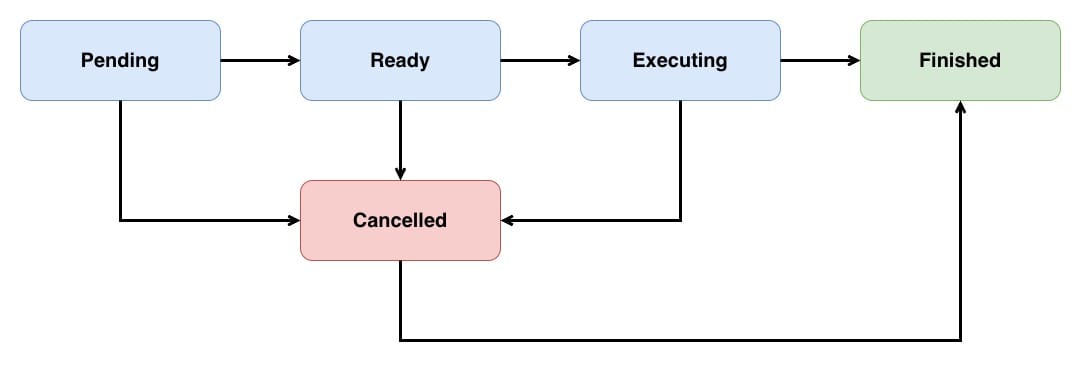
It's important to note that cancelling an executing operation will not automatically stop that operation; instead, it is up to the individual operation to clean up after itself and transition into the Finished state.
Operations come in two flavours:
- Non-Concurrent
- Concurrent
Non-Concurrent operations perform all their work on the same thread, so that when the main method returns, the operation is moved into the Finished state. The queue is then notified of this and removes the operation from its active operation pool, freeing resources for the next operation.
Concurrent operations can perform some of their work on a different thread, so returning from the main method can no longer be used to move the operation into a Finished state. Instead, when we create a concurrent operation, we assume the responsibility for moving the operation between the Ready, Executing, and Finished states.
This post will gradually build up to a working example. But if you can't wait, then head on over to the completed example to see how things end up.
Building Your Wingman
A networking operation is a specialised concurrent operation because when an NSURLSession makes a network request, it does so on a different thread from the thread that resumed that task. Rather than cramming everything into one operation, this solution will focus on building an abstract concurrent operation and then subclassing it to do the fetching and parsing in the subclass.
As mentioned, a concurrent operation takes responsibility for ensuring that its internal state is correct. This state is controlled by manipulating the isReady, isExecuting and isFinished properties. However, these are read-only, so these properties will need to be overridden so that we can set them. Let's start with isReady:
@interface NWMOperation : NSOperation

@end

@implementation NWMOperation

 // 1
@synthesize ready = _ready;

#pragma mark - Init

// 2
- (instancetype)init
{
    self = [super init];

    if (self)
    {
        self.ready = YES;
    }

    return self;
}

#pragma mark - State

// 3
- (void)setReady:(BOOL)ready
{
    if (_ready != ready)
    {
        [self willChangeValueForKey:NSStringFromSelector(@selector(isReady))];
        _ready = ready;
        [self didChangeValueForKey:NSStringFromSelector(@selector(isReady))];
    }
}

// 4
- (BOOL)isReady
{
    return [super isReady] && _ready;
}

@end
Here's what we did above:
NSOperationdeclaresreadyas a read-only property. Overriding it with a custom setter and getter confuses the compiler's automatic ivar generation, so we need to explicitly synthesise the backing ivar_readyourselves. Importantly,_readyis separate from the internal readiness state ofNSOperation-@synthesizecreates a new piece of storage that lives only in this subclass._readyis set toYESat init, signalling that the operation has no internal reason to block execution. This is necessary becauseBOOLivars default toNO, and nothing else in the class ever sets_readyback toYES. Without this,isReadywould always returnNOand the queue would never start the operation.- The setter wraps the state change in
KVOwillChangeValueForKey:anddidChangeValueForKey:calls.NSOperationQueueusesKVOto know when its operations change state, so without these notifications, the queue would never know the operation's readiness changed. The guard_ready != readyprevents redundantKVOnotifications. [super isReady]and_readyare completely independent pieces of state.[super isReady]is managed internally byNSOperationand tracks things like whether dependencies have finished - we never write to it._readyis managed by this subclass. By combining them, the operation is only considered ready when both the internal conditions ofNSOperationare satisfied and the operation hasn't already started.
We then repeat this pattern with isExecuting and isFinished:
@implementation NWMOperation

// Omitted other functionality

@synthesize executing = _executing;
@synthesize finished = _finished;

// Omitted other functionality

- (void)setExecuting:(BOOL)executing
{
    if (_executing != executing)
    {
        [self willChangeValueForKey:NSStringFromSelector(@selector(isExecuting))];
        _executing = executing;
        [self didChangeValueForKey:NSStringFromSelector(@selector(isExecuting))];
    }
}

- (BOOL)isExecuting
{
    return _executing;
}

- (void)setFinished:(BOOL)finished
{
    if (_finished != finished)
    {
        [self willChangeValueForKey:NSStringFromSelector(@selector(isFinished))];
        _finished = finished;
        [self didChangeValueForKey:NSStringFromSelector(@selector(isFinished))];
    }
}

- (BOOL)isFinished
{
    return _finished;
}

@end
Note that we don't call
superinisExecutingandisFinished.
Now that we have control of our operation's state, let's use that control by transiting from Ready -> Executing by overriding the start method:
@implementation NWMOperation

// Omitted other functionality

// 1
- (void)start
{
    // 2
    if (self.isCancelled)
    {
        // TODO: Finish this operation
        return;
    }

    // 3
    if (!self.isExecuting)
    {
        // 4
        self.ready = NO;
        self.executing = YES;
        self.finished = NO;
    }
}

@end
Here's what we did:
startis called by the queue when the operation is ready for execution. By overridingstartrather thanmain, this operation takes full control of its lifecycle - the queue will not automatically move it into theFinishedstate when the method returns. This is essential for concurrent operations where the real work (e.g. a network request) happens on a different thread and completes later.- An operation can start in the cancelled state, so we check
self.isCancelled, and if this operation has been cancelled, we finish this operation (will see that next). - The
!self.isExecutingcheck prevents the operation from being started twice. Without this, a second call tostartwould re-triggerKVOnotifications and potentially confuse the queue. - Update the
isReady,isExecutingandisFinishedstates to ensure that the operation correctly represents its started nature.
Note that
[super start]is intentionally not called. The defaultstartimplementation would callmainand manage the state internally, which would conflict with the manual state management happening here. Subclasses ofNWMOperationoverridestart, and will call[super start](which calls this implementation, not the implementation ofNSOperation).
Let's fill in that TODO:
@interface NWMOperation : NSOperation

// 1
- (void)finish;

@end

@implementation NWMOperation

// Omitted other functionality

- (void)finish
{
    // 2
    if (self.executing)
    {
        // 3
        self.executing = NO;
        self.finished = YES;
    }
}

@end
Here's what we did:
finishacts as a nice symmetrical opposite of thestartmethod, ensuring that when an operation has finished, it is moved into theFinishedstate. It's essential that all operations eventually call this method. As it's to be called by subclasses ofNWMOperation, we expose it in the header.- The
self.isExecutingcheck prevents the operation from being finished twice. Without this, a second call tofinishwould re-triggerKVOnotifications and potentially confuse the queue. - Update the
isExecutingandisFinishedstates to ensure that the operation correctly represents its stated nature. There is no need to updateisReadyas this is already set toNO.
If you are experiencing odd behaviour where your queue seems to have jammed, and no operations are being processed, one of your operations is probably missing a finish call somewhere.
As operations can be cancelled, let's override cancel to call finish:
@implementation NWMOperation

// Omitted other functionality

- (void)cancel
{
    [super cancel];

    [self finish];
}

@end
It's important that regardless of how a concurrent operation ends, it moves into the Finished state.
All that's left to do is to override the isAsynchronous:
@implementation NWMOperation

- (BOOL)isAsynchronous
{
    return YES;
}

@end
As NWMOperation subclasses are always expected to be executed via an NSOperationQueue, overriding isAsynchronous is strictly not needed, but we override it here to express intent clearly.
isAsynchronousonly matters if we callstartdirectly on the operation without a queue. In that case, the caller is supposed to checkisAsynchronousto decide whether to spin up a separate thread.
Armed with an asynchronous parent class, let's add subclasses that can make network requests to take advantage of this new functionality.
Giving Your Wingman a Target
Now that we've built the concurrent operation machinery piece by piece, we can see how little a concrete operation actually needs to add.
StackOverflow has an excellent, open API that we're going to use to build a networking operation.
This networking operation subclass will retrieve and parse the latest answers via the /answers endpoint.
The JSON structure of the
/answersresponse and that response's subsequent parsing aren't shown below as they are not the central theme of this post (which is about the architecture of making a network request), but if you are interested in seeing everything working together, check out the example project.
Let's look at the complete operation and then examine 👀 the interesting parts:
// 1
@interface NWMAnswersRetrievalOperation : NWMOperation

@end

// 2
@interface NWMAnswersRetrievalOperation ()

@property (nonatomic, copy) void (^completion)(NSArray *answers);

@end

@implementation NWMAnswersRetrievalOperation

#pragma mark - Init

// 3
- (instancetype)initWithCompletion:(void (^)(NSArray *answers))completion
{
    self = [super init];

    if (self)
    {
        self.completion = completion;
        self.name = @"Answers-Retrieval";
    }

    return self;
}

#pragma mark - Start

// 4
- (void)start
{
    [super start];

    NSURLSession *session = [NSURLSession sharedSession];

    NSURL *url = [NSURL URLWithString:@"https://api.stackexchange.com/2.2/answers?site=stackoverflow"];

    NSURLSessionDataTask *task = [session dataTaskWithURL:url
                                        completionHandler:^(NSData * _Nullable data, NSURLResponse * _Nullable response, NSError * _Nullable error)
                                  {
                                      NSDictionary *answersJSON = [NSJSONSerialization JSONObjectWithData:data
                                                                                                  options:NSJSONReadingMutableContainers
                                                                                                    error:nil];

                                      NWMAnswerParser *parser = [[NWMAnswerParser alloc] init];
                                      NSArray *answers = [parser parseAnswers:answersJSON[@"items"]];

                                      if (self.completion)
                                      {
                                          self.completion(answers);
                                      }

                                      [self finish];
                                  }];

    [task resume];
}

@end
Here's what we did above:
NWMAnswersRetrievalOperationsubclassesNWMOperation, inheriting all the concurrent operation machinery - the manual state management, KVO notifications, andstart/finishlifecycle. This means it only needs to focus on the specifics of its own network request and parsing.- The class extension declares a private
completionblock property. This property is only set once during init and called once from the network response callback. - Store the completion block and give the operation a human-readable name - the name is useful for debugging.
startis where the actual work happens.[super start]is called first, which triggersNWMOperation's state transition fromReadytoExecuting. Then anNSURLSessiondata task is created and resumed. When the task completes on a background thread, the response is parsed into model objects viaNWMAnswerParser, the completion block is called with the results, and[self finish]transitions the operation into theFinishedstate so the queue can reclaim the concurrency slot. The order matters -finishmust be called after the completion block, otherwise the operation could be deallocated before the block executes.
Now that we have an operation making a network request, we need to schedule that operation.
The Support Crew
So far, 2 of the 3 responsibilities of the networking layer shown above have been built:
- Performing networking requests
- Parsing the response from network requests
Time to look at the final responsibility:
- Scheduling network requests.
If we refer back to the class structure above, this responsibility is handled by both the APIManager and OperationQueueManager classes. The APIManager knows about a specific operation, and the OperationQueueManager knows how to schedule an operation on its queue. Let's start with the OperationQueueManager:
@interface NWMOperationQueueManager : NSObject

// 1
+ (instancetype)sharedInstance;

// 2
- (void)addOperation:(NSOperation *)operation;
@interface NWMOperationQueueManager ()
// 3
@property (nonatomic, strong) NSOperationQueue *queue;
@end
@implementation NWMOperationQueueManager
#pragma mark - SharedInstance
+ (instancetype)sharedInstance
{
static NWMOperationQueueManager *sharedInstance = nil;
// 4
static dispatch_once_t onceToken;
dispatch_once(&onceToken, ^
{
sharedInstance = [[NWMOperationQueueManager alloc] init];
});
return sharedInstance;
}
#pragma mark - Init
- (instancetype)init
{
self = [super init];
if (self)
{
self.queue = [[NSOperationQueue alloc] init];
}
return self;
}
#pragma mark - AddOperation
- (void)addOperation:(NSOperation *)operation
{
[self.queue addOperation:operation];
}
@endHere's what we did:
NWMOperationQueueManageris a singleton. Using a singleton means all operations across the app are funnelled through the same manager, giving us a single point of control.addOperation:is the only way to schedule work through this manager. It accepts anyNSOperationsubclass, which keeps the interface generic - the manager doesn't need to know aboutNWMAnswersRetrievalOperationor any other concrete operation type.- The class extension declares a private
NSOperationQueue. By hiding the queue behindaddOperation:, external code can never directly manipulate it - they can't pause it, change its concurrency limits, or remove operations. This encapsulation also makes it straightforward to expand later, for example, adding a second queue for system events versus user-driven events, with eachAPIManagerspecifying which queue to target. - The
dispatch_onceblock ensures the shared instance is only created once, even if multiple threads callsharedInstancesimultaneously.
With an operation queue to schedule work on, let's build the APIManager:
@interface NWMAnswersAPIManager : NSObject

// 1
+ (void)retrieveAnswersWithCompletion:(void (^)(NSArray *answers))completion;

@end
@implementation NWMAnswersAPIManager
#pragma mark - Retrieval
+ (void)retrieveAnswersWithCompletion:(void (^)(NSArray *answers))completion
{
// 2
NWMAnswersRetrievalOperation *operation = [[NWMAnswersRetrievalOperation alloc] initWithCompletion:completion];
[[NWMOperationQueueManager sharedInstance] addOperation:operation];
}
@endHere's what we did above:
retrieveAnswersWithCompletion:is a class method (+), so callers don't need to create an instance of the manager. Using a class method keeps view controller code clean - no manager instances to store as properties or manage lifecycle for. The completion block follows the same pattern as the operation, returning anNSArrayof parsed answers ornil.- Creates a configured
NWMAnswersRetrievalOperationwith the caller's completion block, and schedules it on the sharedNWMOperationQueueManager. The caller never needs to know that operations or queues exist - they ask for answers and get a callback. The boundary between feature and fetching isolates both parts and helps to ensure clear responsibilities.
And with that, all three responsibilities are now in place! 🪇
Going Home
In some ways, we got lucky that NSURLConnection was hard to use. That difficulty forced us to build structure around our networking code, and that structure led us to make smarter decisions about where functionality lived.
When NSURLSession removed the difficulty, the structure went with it.
Building a networking layer around NSOperation isn't about making things harder again. It's about restoring the boundaries that keep responsibilities clear.
To see the complete working example, visit the repository and clone the project.